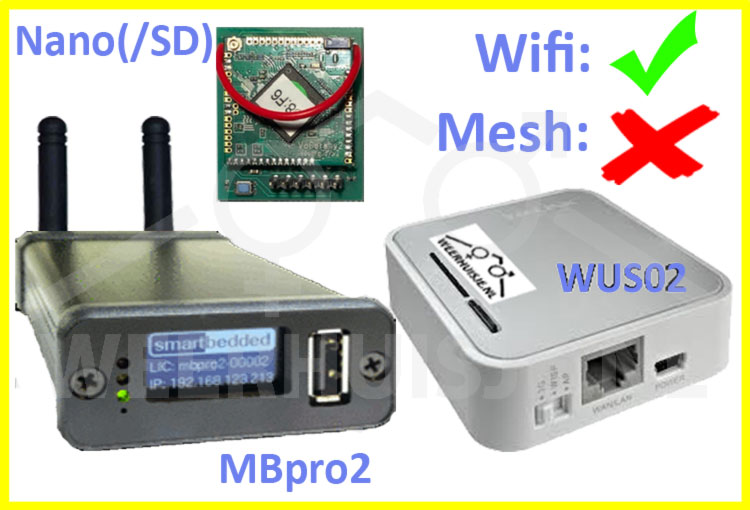
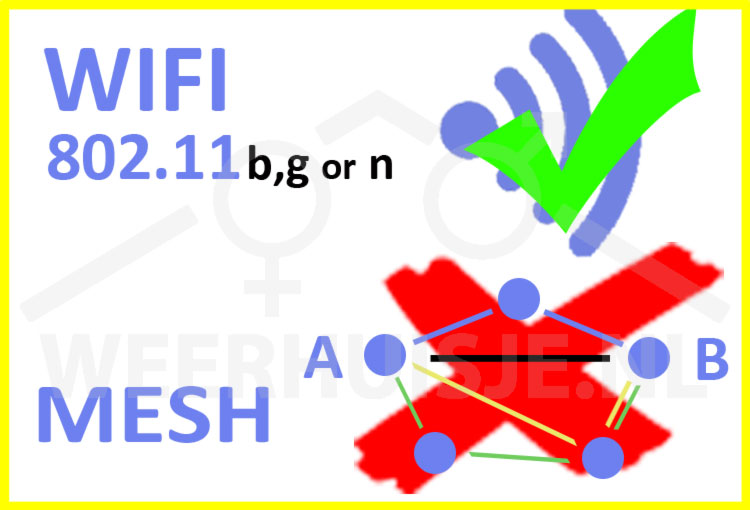
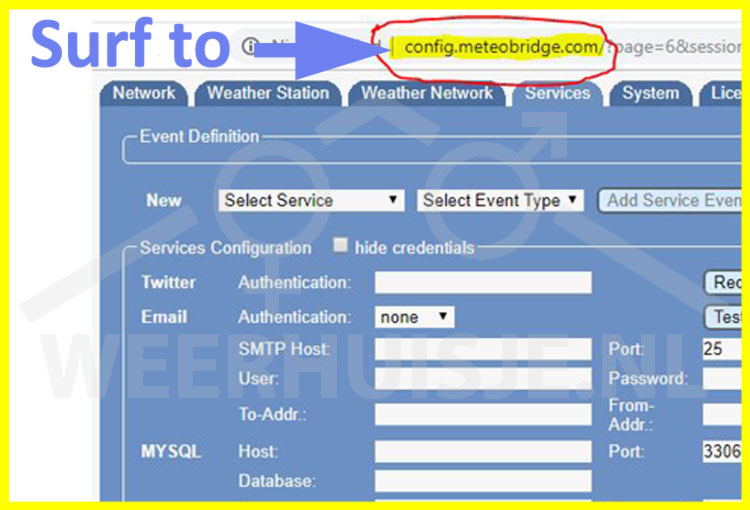
<b><font size="3">&#8505; </font></b> Meteobridge

Meteobridge

1.1 What is Meteobridge?
Meteobridge is a small energy-efficient upload server providing instant weather data available on the Internet. Your actual weather information available anytime, anywhere. Providing you as well as other weather enthousiasts an insight on your weather data. And conversely, you also can access weather data of other weather stations. An enrichment for weather enthousiast and professional user.

Meteobridge history
2013-01 - Meteobridge
2014-03 - Meteostick
2015-12 - Meteobridge Pro(+)
2018-05 - Meteobridge Nano
2022-11 - Meteobridge Pro2

1.2 Meteobridge, a variety of possibilities.

STD/ | Pro2/     | Several functions of the standard meteobridge (STD) and mb-Pro/nano-SD
Nano | NanoSD

YES        YES        Upload to various weather collection sites such as Wunderground, WOW, Windfinder and many more.
YES        YES        Your own plug & play weather website at www.myownweather.eu
YES        YES        Feed weather templates (on your own website) such as Leuven, Weather34 etc.
YES        YES        Insert weather data on your own existing website via e.g. FTP or HTTP commands
YES        YES        Send data directly to your own MySQL database.
YES        YES        Send camera images.
YES        YES        Send SMS and/or email notifications/alarms.
YES        YES        Remote management.
YES        YES        Alert via email or sms when conditions for weather variables are exceeded.
YES        YES        Twitter: Post automatic tweets based on pre-set conditions.

NO        YES        Internal storage of weather data in local meteobridge database.
NO        YES        Easily generate graphs for submission or access directly via URL.
NO        YES        Data export to internal memory which is then sent periodically.
NO        YES        Weather data import from e.g. Cumulus, Meteotemplate, Weewx, WSWIN or your own data.
NO        YES        Automated data backup option of internal database.
NO        YES        Personalized data presentation on display (Meteobridge Pro only).
NO        YES        Nano SD only | Home weather station dashboard accessed directly from the meteobridge.
1.3 Meteobridge and Davis
There are several ways to connect a Davis Vantage Pro2 or Davis Vantage Vue to a meteobridge.
  • Meteobridge Nano (SD) - The simplest solution. Is seated in the console (or Envoy).
  • Meteobridge standard (WUS02) - You already have a Davis logger? Simply connect it to the WUS02 meteobridge.
  • Meteobridge Pro (black) - Connected via Davis 6510USB or Davis 6555 IP logger.
  • Meteobridge Pro+ (red) - Receive and upload weather data independently of your console.

Davis receiver vs own meteobridge receiver, the differences:
Data via Davis receiver (console, envoy) uses specific (calculated) values from Davis console such as:
  • Textual weather forecast.
  • ET (solar sensor required).

Data via meteobridge receiver (meteostick, meteobridge Pro +). Extensive possibilities for alternative configurations:
  • All 8 transmitter IDs can arbitrarily be configured as ISS, Instromet sun hours station, solar / UV etc ...
  • No console required.
1.4 Meteobridge std (WUS02)
  • Weather data is forwarded to the desired internet locations.
  • System settings are loaded and activated via meteobridge server.
  • No own database. So no chance of database corruption. Very robust!
1.5 Meteobridge  Pro2
  • MB Pro2 > With built-in Davis receiver
  • Own weather data storage > internal database.
    • up to 10 yrs per minute resolution.
  • Autonomous generation of (extensive) graphs (have a look at the bottom of the page).
  • Display charts dynamically show/hide weather variables and time span.

1.6 Meteobridge Nano
  • Meteobridge Nano is seated in the logger slot of a Davis console or Envoy.
  • Via local Wi-Fi network it connects to the internet.
  • Same functionality as the standard meteobridge. Only suitable for Davis stations.
  • With Davis logger memory chip. Existing weatherlink PC software can simply continue receiving the weather data. The Nano behaves like a Davis 6555 IP datalogger.


Meteobridge Nano SD (Pro)
  • With internal SD storage. Same functionality as the Meteobridge Pro.
  • Own weather data storage in internal database.
  • Autonomous generation of (extensive) graphs (e.g. at the bottom of the page).
  • Display graphs: dynamically show/hide weather variables and adjust time span.

Supported weather networks and weather stations
In addition to the weather networks below, an easy alternative is your own plug & play weather website!
For more information: www.myownweather.eu
1.7 Weather networks
APRS
Open weather map
Previmeteo
Idokep
Weatherflow
Wetter.com
Weather cloud
Meteonews
Terre-net
Anything weather
Meteoplug Cloud Graphing

> For a complete list, visit www.meteobridge.com

Weather networks (cntd)

  • Weather Underground
  • Weather Underground CAM
  • Windfinder
  • WOW / WOW-NL / WOW-BE
  • Windguru
  • Meteobridge Weer CAM
  • AWEKAS
  • Wedaal
  • WeatherBug Backyard
  • WeatherForYou
  • CWOP
Weather Stations
  • Meteostick (Davis ontvanger)
  • Davis Vantage Pro2 , Pro1 (behalve firmware A ),  Davis Vantage Vue, Envoy, Envoy 8x
  • Oregon WMR200,  WMR100 , WMR88, WMRS200, WMR968 (US) , WMR928 ( EU)
  • TFA Nexus, Sinus Meteotime Duo. Meade TE923 , TE827 , TE821 , DV928
  • Ambient Weather WS1090 , WS2080
  • Peet Bros ULTIMETER 100 , 800 , 2100
  • RainWise MkIII
  • Acurite 1025/1035/1525, Internet -Bridge
  • La Crosse WS2300 (WS2350, WS2355, WS2357)
  • La Crosse / ELV WS300PC/444/500 en diverse klonen ( WS550/777/888 , WDC7000 )
2.0 Meteobridge wireless network restrictions

Supported Wifi network types:
  • Wifi network type 802.11b
  • Wifi network type 802.11g
  • Wifi network type 802.11n

Please note!!!!
Adding meteobridge to a MESH network is NOT supported..

2.1 Meteobridge user interface demo

A demo user interface is available at config.meteobridge.com

There youwill find how easy you can make adjustments and activate functions yourself. The demo interface is not 100% complete. The "live data" tab, for example, is missing here. The options of the meteobridge pro are also not included in this simple demo. But you do get a good idea of how it works.
2.2 Meteobridge login

The meteo bridge is connected to the network, find below how to start the user interface.

  • Obtain the IP address of the Meteobridge.
  • Type in the address bar of your web browser: magicip.meteobridge.com (IP address can also be retrieved via the router)
  • Click on the link in the line on the screen (eg: "Meteobridge 'model' (MAC 1E: 12: 0A: 1E: 7E: 3B) with LAN IP 192.168.10.211 at - date / time -".

Enter the user name and password in the pop-up screen. Standard credentials:
  • Username: meteobridge
  • Password: meteobridge.
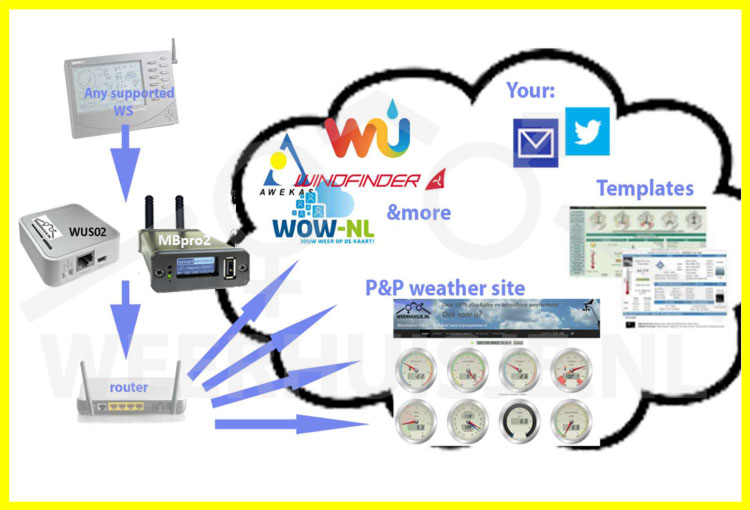
2.3 Activate internet access
In order to gain access to the meteobridge user interface outside of your own network (via a random internet connected computer), external access must be activated in the user interface.
Note: For security reasons we advise to change the login password.

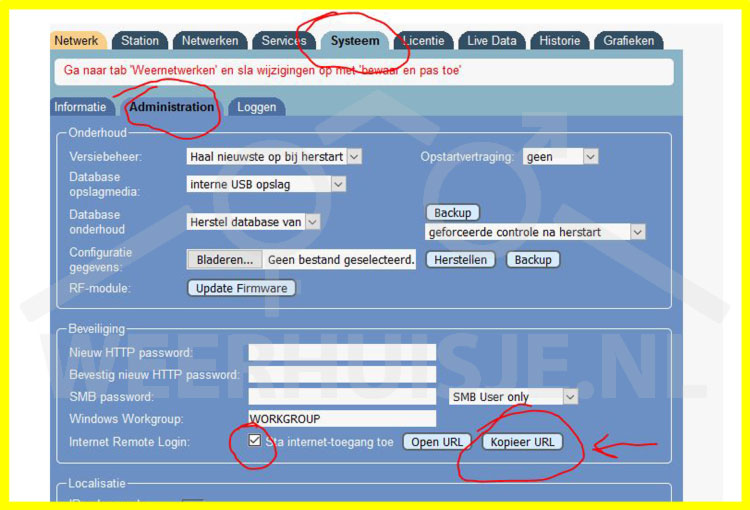
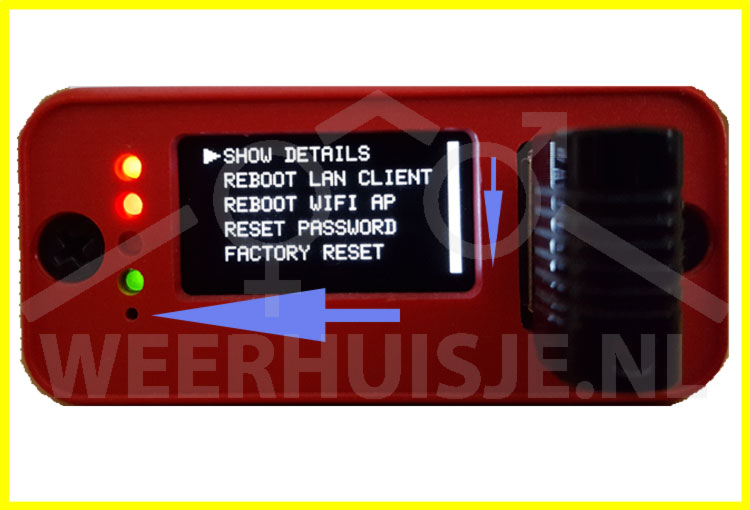
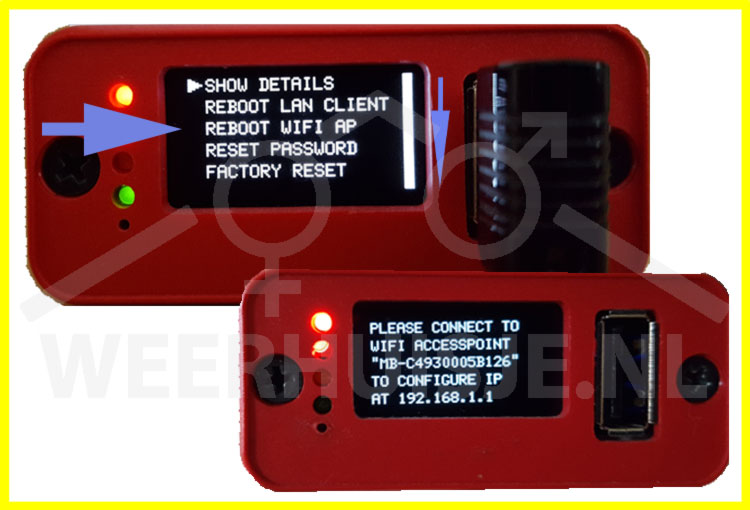
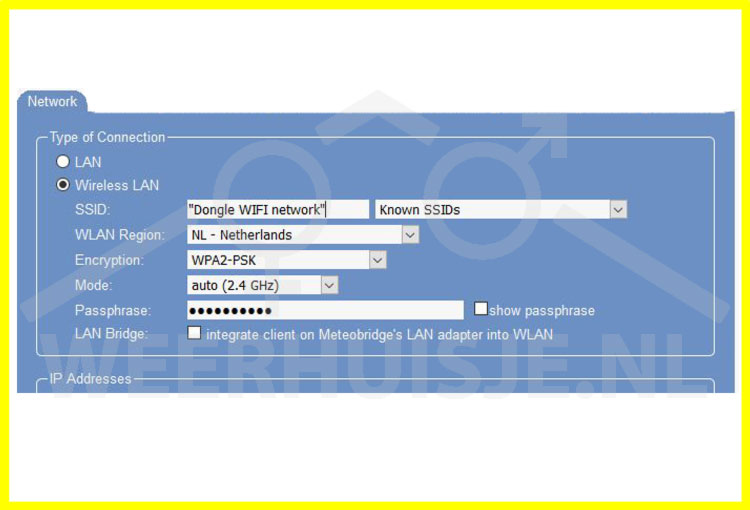
Perform the following steps to gain remote access to the meteobridge (see image above).
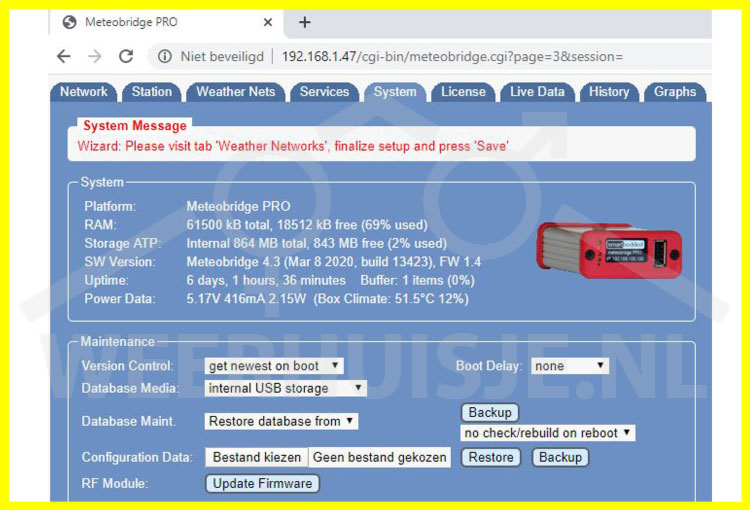
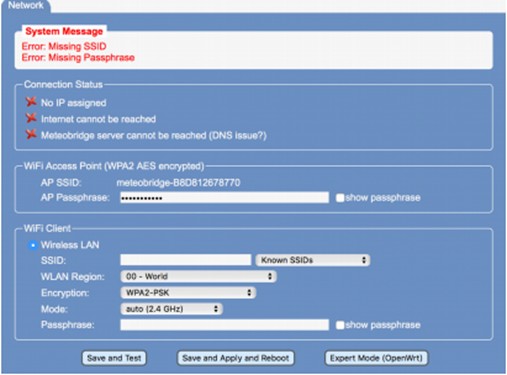
  • Login to the meteobridge and select tab "System".
  • Sub tab administration: In the 'Security' block, place a checkmark at "Internet login"
  • [Open URL] Opens the URL on new page. [Copy URL] copies to clipboard.
  • With the https: // link that appears you can login to the meteobridge from the Internet.
2.4 Standard meteobridge reset options

The reset procedure for the standard meteobridge (TPlink MR3020 - white square box) offers 3 options:
1. Network settings restored to DHCP LAN mode (wired mode).
2. Reset user interface password WUS02.
3. Delete all settings and return to factory default.

The procedure:
  • Remove the mains voltage from the meteobridge and wait for 15 seconds.
  • Reconnect the mains voltage.
  • The LED of the RESET button starts to flash slowly.
  • When the LED starts to flash quickly, press and hold the RESET button.
  • The LED stops flashing:
  • Choose the correct reset:
    • Release after 1x flash: Network settings restored to DHCP LAN mode (wired mode).
    • Release after 2x flash: Password of user interface of the meteobridge will be reset to standard: meteobridge
    • Release after 5x flash: All settings back to factory default.

The video shows the last option. Be very careful with that, all user settings are lost and this can have major consequences!

2.5 Meteobridge Pro(+) menu options
There is a pinhole under the LEDs with a push button behind it. Activate this with a paper clip.
The menu appears.

Menu
  • Show details
    • Shows details such as IP address and system variables.
  • Reboot LAN client
    • Restart the meteobridge via the network cable connected to the router.
  • Reboot WIFI AP
    • Restart the meteobridge in Wifi access point mode.
      • I.e. for configuring mobile network mode,
      • After restarting, a WIFI network "meteobridge ....." is available as WIFI network.
  • Reset password
    • Reset meteobridge password to "meteobridge".
  • Factory reset
    • Deletes all user settings.
    • Restarts with standard factory settings.

Vertical lines on the screen
The lines wander to the center of the screen. This happens when there is no current weather data to display. In other words there is no reception from the outdoor unit.
2.5.1 Backup Configuration & data

Go to:
  1. System tab
  2. Sub-tab Administration
  3. Backup database
    • meteobridge Pro(2):
      • Insert a sufficiently large USB stick into the front USB connector of the meteobridge and click on [Backup now] (A).
    • NanoSD:
      • Go to: http://ip-of-your-meteobridge/cgi-bin/download.cgi
      • Select the file you want to back up on the page that appears under the heading "backup".
  1. Backup/restore configuration:
    • Backup: Click the [Backup] button (B). Find the backup file in the download folder. Move the file to a folder where you can find the file.
    • Restore: Push [Restore] and select the configuration backup file.
      • Click [Restore]
2.6 Proper shutdown of meteobridge Pro

The meteo bridge Pro (+) has its own internal database. Just shutting down the power supply can lead to the corruption of the weather database.
There are two ways to safely shut down the meteo bridge.

Through the user interface of the meteobridge:
  • Log in to the meteobridge and go to the system tab.
  • Press shutdown and wait until the display and LEDs are off.

Exit Meteobridge pro (+) without logging in to the user interface.
  • Press the pin hole under the LEDs with a paper clip.
  • Press and hold until the vertical bar on the right is completed.
  • "SHUTDOWN" appears on the screen.
  • Wait until the message disappears and the LEDs are off.
  • You can now disconnect the meteobridge from the power supply.

2.7 Wingle 3G / 4G setup (mobile Internet)
The adjacent picture schematically shows the various network connections. The Wingle (aggregation of Wifi and dongle) supports two networks. A local WiFi network and mobile network connection to the Internet.
The meteobridge can start itself with a Wifi access point (AP) network and can be set up to connect to the internet via the Wingle Wifi network.

Three networks:
  1. Meteobridge Wifi access point (AP) network Exclusively used to setup the Wifi network settings of the meteobridge.
  2. Wingle Wifi network:
    • For wingle (router) management using phone, tablet etc.
    • For meteobridge connection to the internet.
  1. Wingle connection to mobile Internet. This connection is automatically establised after placing the pin free SIM card.

Data usage:
The consumption of mobile data depends on the amount of data that is sent and the frequency of uploading. This may vary by provider. Data consumption with a 5 minute interval and a standard upload (e.g. to windfinder or wunderground etc.) on average varies from 300 to 1000 Mb per month.

Pay attention:
  • Use a SIM card without a PIN code !!
  • The wingle automatically creates its own WiFi network and also automatically connects to the mobile network.
  • The meteobridge uses the WiFi network of the wingle to connect to the internet.

2.7a Step 1
Insert SIM card in wingle.
  • Slide the side cover off the wingle housing (see Fig.).
  • Place the SIM card (without PIN code !!) in the wingle as shown in the picture.
  • Place the side cover back onto the wingle.
  • Place optional antenna (s) on the wingle (not included with each model).
  • Place the wingle in the supplied dock (see image).
  • Connect the USB cable from the dock to the USB connector on the front of the meteobridge.
  • The wingle only uses this connection for power supply.
2.7b Step 2
Adjust WiFi network settings of the meteobridge (1.).

  • Activate the menu with the boot options (Howto: see respective item on this page).
  • Choose "REBOOT WIFI AP"
  • Wait until screen: "PLEASE CONNECT TO ...." appears.
  • Use a telephone or tablet etc to connect to the indicated Wifi access point.
  • Start a browser and enter the indicated IP address 192.168.1.1 in the address bar.
Image (left) appears.
  • Under "Known SSIDs" select the WiFi network of the wingle:
  • Choose correct WLAN region and additional settings as indicated on img (left).
  • Enter the password for the Wingle Wifi network (2.) at: Wireless LAN > Passphrase.
  • Choose Save and Restart.
2.7c Step 3
After startup of the meteobridge, it connects to the internet via the Wingle WiFi network (Step 2).

Control and maintenance
You can now approach the operational system via a telephone, tablet, etc. for inspection and maintenance.

Meteobridge:
Both local and remote access via the internet is supported.

Locally connect to meteobridge user interface.
  • Connect your device to the WiFi network of the wingle.
  • Open a browser and enter in the address bar:
    • magicip.meteobridge.com> Click on IP address of found meteobridge or,
    • The local IP address of the meteobridge (view scrolling display).

(Remote) connection to the user interface of the meteobridge via the Internet.
  • To use remote login "Internet Remote Login" > tab: System, block: Security must be activated.
    • With "copy URL" the URL can be copied and saved.
  • Open a browser and enter the Remote login URL in the address bar.

Wingle router
Can be reached locally via the Wingle Wifi network. Connect to the SSID of the Wingle network. Then enter the IP address of the wingle in the browser address bar.

Standalone Wingle configuration settings
  • The Wingle is preconfigured. Follow the steps below for the Wingle's settings menu.
  • Open a browser on a computer.
  • Place the Wingle in a USB slot of a (Windows) PC.
  • After a few moments two new tabs will open, one of which gives access to the settings menu.
  • Login name = admin. The password is the same as the WLAN KEY of the Wingle and can be found on the sticker of the Wingle packaging,
2.8 Nano WiFi setup - Install and make connection.
  • First install the NANO in the Davis console (or Envoy).
    • Remove the power supply and batteries.
    • Place the NANO at the location of the data logger and press firmly (no brute force).
    • Install the batteries and connect the power supply.
    • Keep your eyes on the Nano and check the startup:
      • LED turns on.
      • LED flashes slowly (starting your own operating system).
      • LED flashes quickly (starting up the meteobridge software).
        • After the meteobridge has been successfully connected to your Wifi network the LED will light permanently.
        • See below how to connect the meteobridge to your Wifi network.
2.8a Connect to your WiFi network
  • Search your WIFI connected computer, tablet or smartphone for network: meteobridge-… ..
  • Connect to this meteobridge-… .. network.
    • Password: meteobridge
  • Open your browser and type in the address bar: http://192.168.169.1
  • Login with:
    • username: meteobridge
    • password: meteobridge
  • Wait until meteobridge user interface appears (see image).

Setup WIFI options:
  • SSID: Click on [known SSIDs] and choose your WiFi network.
  • WLAN Region: Select your country
  • Encryption: Usually this is WPA2-PSK, otherwise consult the router setting.
  • Mode: auto (or your own preferred choice)
  • Passphrase: WiFi password of the chosen network
  • Click [Save and Test]

Image on the left appears
  • The Nano is now successfully connected to the network.
  • "Connected to WLAN with IP xx.xx.xx.xx" (the 192.168.1.68 IP address will consist of other numbers on your wifi network)
    • xx.xx.xx.xx represents the IP address of the Nano assigned by your router.
    • The current IP address may deviate from this example.
  • Now click on [Save and Apply and Reboot] at the bottom of the page.
  • The meteobridge restarts and after 2-3 minutes is included in your own WiFi network.

Log in to the Nano
  • Open your browser (make sure your device is connected to your own local network again) and enter this URL (or the previously found IP address) in the address bar: magicip.meteobridge.com and press [enter]
  • A login screen or link appears:
    • Username: meteobridge
    • Password: meteobridge
  • The user interface of the Meteobridge Nano appears.
  • You now can get started!
2.9 Meteobridge Nano reset options
When NANO is stuck at blinking fast or LED is steady on you can do some reset operations by pressingthe small blue button on the NANO board next to the pin header. Which operation is triggered by pressing the button is determined by how long you keep the button pressed. When pressing down the button theLED  will go off and will then start blinking slowly. You can now select a special reset operation by keeping the button pressed until a specific number of blinks is done.

These are the reset options to choose from:
  • Release  button after first blink:
    • Resets password of WiFi access point that the NANO provides forinitial login. Password is set to “meteobridge” and NANO is rebooted
  • Release button at second blink:
    • Resets HTTP password to “meteobridge” and reboots
  • Release button at fifth blink:
    • Reset NANO to factory defaults (all settings are lost) and reboot.
3.0 IP camera hardware installation
  • PoE adapter included. Power for the camera is supplied via the network cable.
  • Network cables not included. Use fully wired CAT5 network cables.
  • Use diagram (left) to install the camera.
  • Connect “CAM" - labeled connector to the camera, "LAN" - labeled connector to the router.
    • LAN cable directly to the internet router.
    • LAN cable via WiFi extender-with-LAN-port to the internet router.
      • Note: WiFi extender not included.

3.1 Test camera (cam is pre-configured)
Step1: Use SADP tool to find out the camera's IP address.

Test camera snapshot:
  • Take a test snapshot> Open your browser> Type in the address bar:
  • http: // user: password@ theIPaddressfromstep1 / streaming / channels / 102 / picture
Activate meteobridge camera uploads:
  • Login to meteobridge (see Product info> meteobridge)
  • Go to: Station tab section meteobridge cam select External Picture (see image)
  • URL not preconfigured? Enter the URL below.
    • http://user:password@theIP-address-of-step1/streaming/channels/102/picture
    • user: password> see camera packaging
    • Cam URL already configured? Replace 'theIP-address-of-step1' with the IP address at Step1
At own risk!
  • Adjust cam settings?
    • Type Cam IP address in the browser's address bar
    • Login to the camera:

3.2 Keep using weatherlink PC together with meteobridge.
  • Resolve the IP address of the meteobridge.
  • Check minimum SW version on the WUS02> system tab> system> SW version> Meteobridge 2.5 (xxxx).
  • SW version lower than 2.5? Get an updated license.
  • Open the Weatherlink program on your PC.
  • Go to Setup > Communications port
  • In the Communications block, select: TCP / IP
  • Select "Remote IP address" and enter the Meteobridge IP address.
  • Click OK. You can now download the weather data from the data logger.
3.3 Can connect but no upload
The WUS02 uses the standard port 80 for web pages. In some routers, outgoing traffic on port 80 is blocked, and this setting must be set to allow outgoing traffic via port 80.
3.4 Mail settings Gmail
Gmail configuration settings:
  • Authentication: TLS
  • SMTP host: smtp.gmail.com
  • Port: 587
  • User: user@gmail.com
  • Password: pw associated with "user@gmail.com"

Gmail considers mails sent from an application (in this case the Meteobridge sw) to be potentially dangerous. To still be able to use gmail execute below steps:
  • Make sure you are logged in to your Google (mail) account and execute:
    1. https://www.google.com/settings/security/lesssecureapps > Click "enable"
    2. https://accounts.google.com/DisplayUnlockCaptcha (no further action required
  • The settings are activated immediately.
3.5 License upgrade WUS02 meteobridge
Installing the 2 year license upgrade goes as follows:

First of all, you need a new license code. You can find that on weerhuisje.nl under > Products > Meteobridge > WH-WUS02-LIC (meteobridge upgrade license extension 2 years).
  1. Login to the meteobridge and go to tab "License".
  2. Enter the new code in the "Update key" field.
  3. Press the [Update License] button.

The new code is being processed. The meteobridge license key renewal has been completed.
Integrate customized widgets and templates on your own website. Meteobridge and/or Meteobridge Pro offer different options for this features. Creating the widgets is relatively easy. Weerhuisje.nl can also provide support.
4.1 Text over image
  • Two examples of placing weather data text (with shadow) over an existing image on your site.
  • Here we use a HTML template with weather variables. The variables are replaced by current values per set interval and placed on the site via an FTP upload as an HTML file
  • Technique: HTML / css template
4.2 Wind rose

  • Extremely easy to implement wind rose.
  • Left. Scalable windrose image to be inserted in your own website.
  • Right. Scalable wind rose image with text-over-image (in this example: speed)
  • Example: examplewindrose
  • Contact us for more info/

  • Eenvoudig te implementeren windroos.
  • Links. Schaalbare windroosafbeelding in te voegen in eigen website.
  • Rechts. Schaalbare windroosafbeelding met text-over-image (in dit vb: snelheid)
  • Een voorbeeld: www.mijneigenweer.nl/1-windroos
  • Voor meer info, neem contac met ons op.
4.3 Steel series gauges
  • The steel series gauges have been developed by Gerrit Grünwald. Mark Crossley then developed gauges for weather variables.
  • The gauges are based on HTML canvas and javascript code.
  • Uses HTTP request. This allows high-frequency updates (a few seconds).
  • More complicated to integrate into a website.
  • Meters available for temperature control, humidity, barometer, wind, UV precipitation, Solar.
4.4 Export charts (MB pro only)
  • Compose your own charts or choose from existing templates.
  • Graphs can be adjusted interactively (once placed on your own website) to show/hide weather variables and time frame.

All-in-one graph (left)
Min/max/average (right)
4.5 Sun hours per Month
Left (requires Instromet sun hours sensor)

Sun hours per year + daylight time
Right (requires Instromet sun hours sensor)